mapswipe-docs
For MapSwipe Managers
Becoming a project manager
Project managers can log into the manager dashboard with their MapSwipe app credentials. So, before a user can become a project manager, s/he must have an account in the MapSwipe app (web or mobile). MapSwipe app users are referred to as contributor users in the manager dashboard.
The super admin would have to create a user for the manager dashboard using the email address the user used to sign up in the MapSwipe app. Once the manager dashboard user and the MapSwipe user account is linked, a user can log into the manager dashboard.
Future iteration
For new project manager requests, users would have to fill out a quick Slackbot survey. It will ask for simple inputs:
- Full name
- Organization
- Contributor user email address
- Contributor user ID
- Community dashboard profile link
- Purpose
The responses are collected altogether in a private Slack channel, which the governance team will be a part of. After confirming the intent, the appropriate channel members will reach out to the requester with an update and super admin with a request to create a project manager.
After the pre-requisites are complete, the super admin created a project manager and get back to the requester.
Logging in as a project manager
Once a user has project manager rights following the above section, project managers must use their existing contributor user email address and password to sign in to the manager dashboard.
Things to keep in mind:
- The contributor user's email address must be verified
- Contributor user and project manager email address and password must be the same
- Resetting the password for contributor user will reset the password for project manager account as well
If errors persist after the details are accurate, please contact super admin
Removing a project manager
Similar to the project manager creation, a project manager access can be revoked by the super admin. To request a revoke of a user, please contact the super admin with the revokee's contributor user id and email address.
Setting up a new MapSwipe project
Any of the Missing Maps members can request a MapSwipe project. If you want to add a new project, but don't know how to do it, it will be best to reach out to the MapSwipe community via Slack.
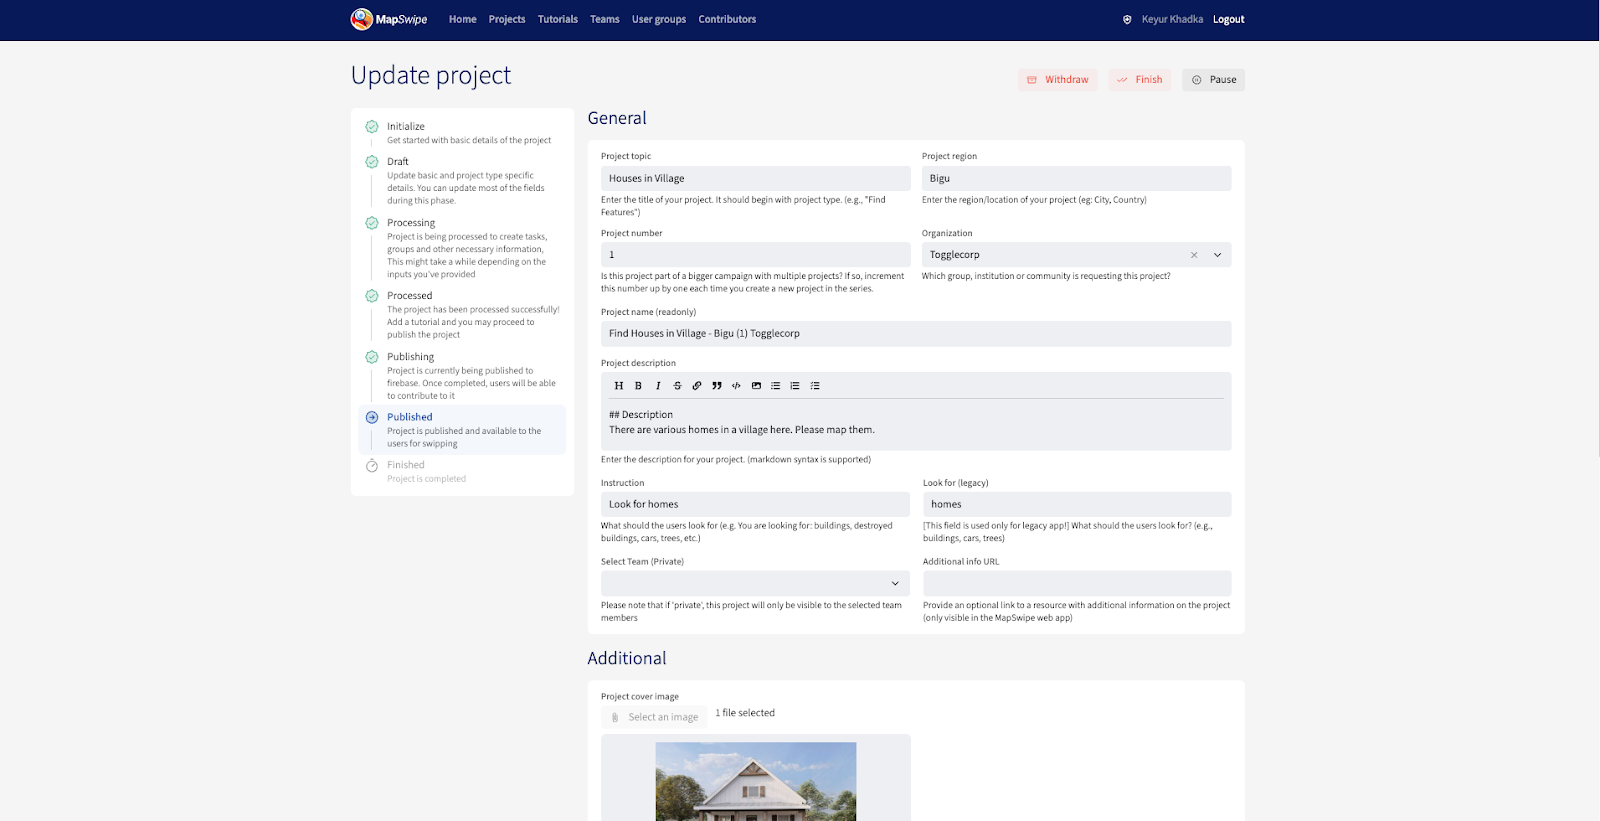
To set up a new project you can create a project draft through the Manager Dashboard. Sign in with your MapSwipe account.
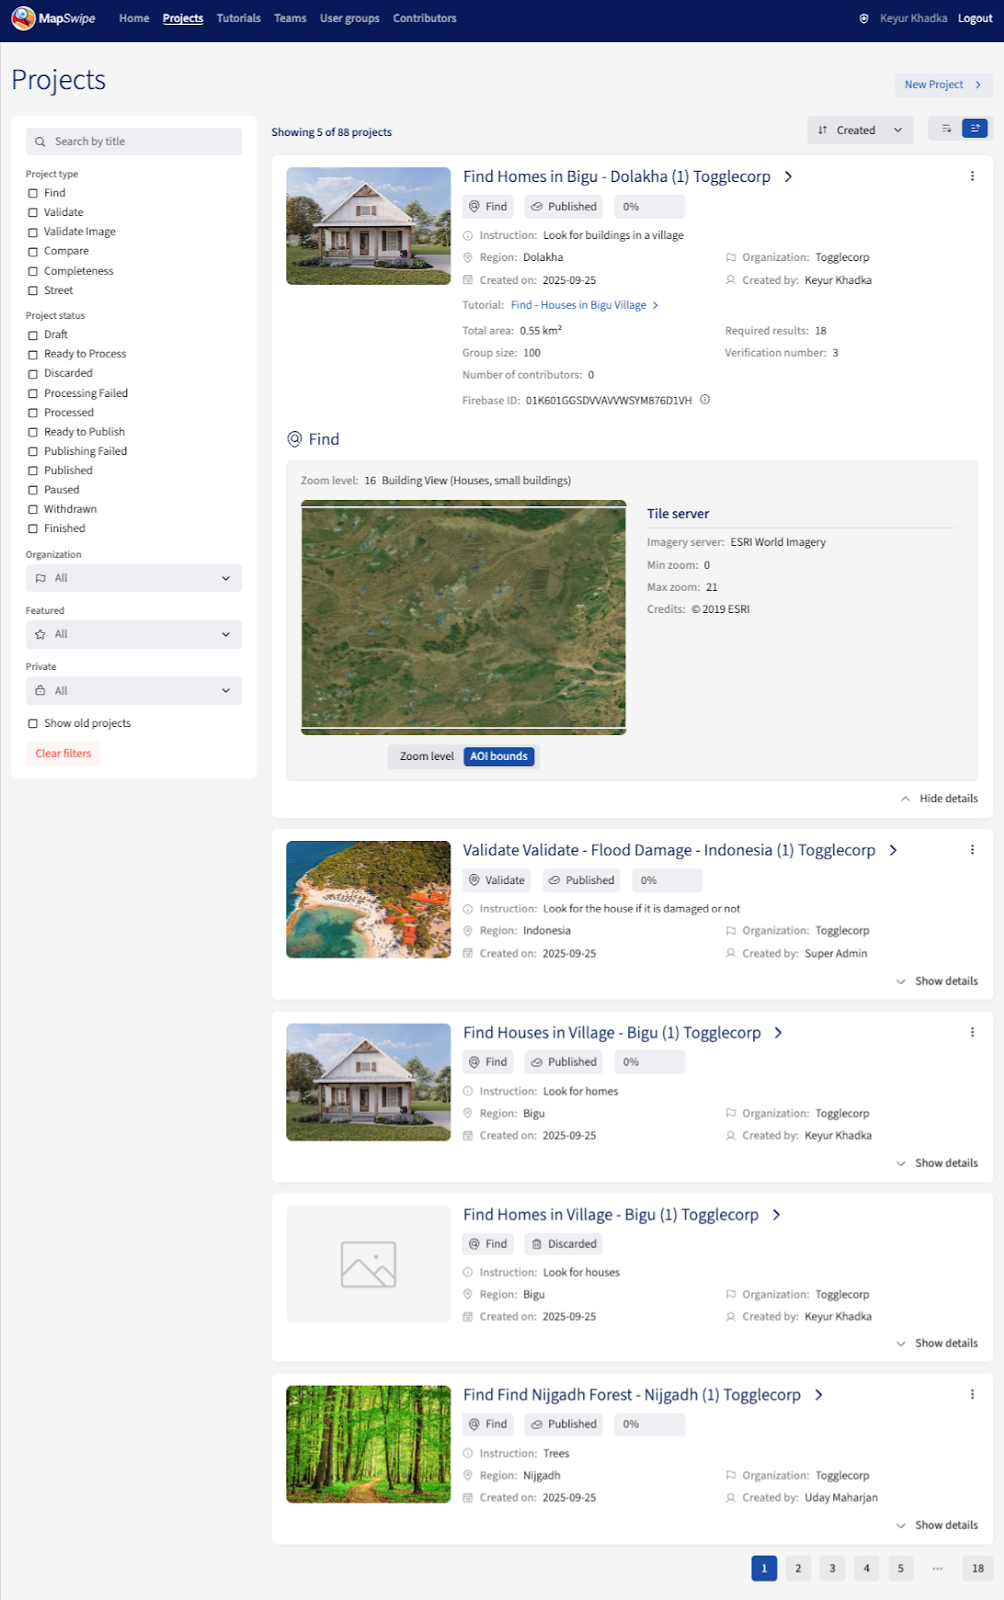
In order to create new projects you need dedicated project manager credentials. Reach out to the MapSwipe community if you don't have these already. Once you're signed in, you will see a screen similar to the one below.

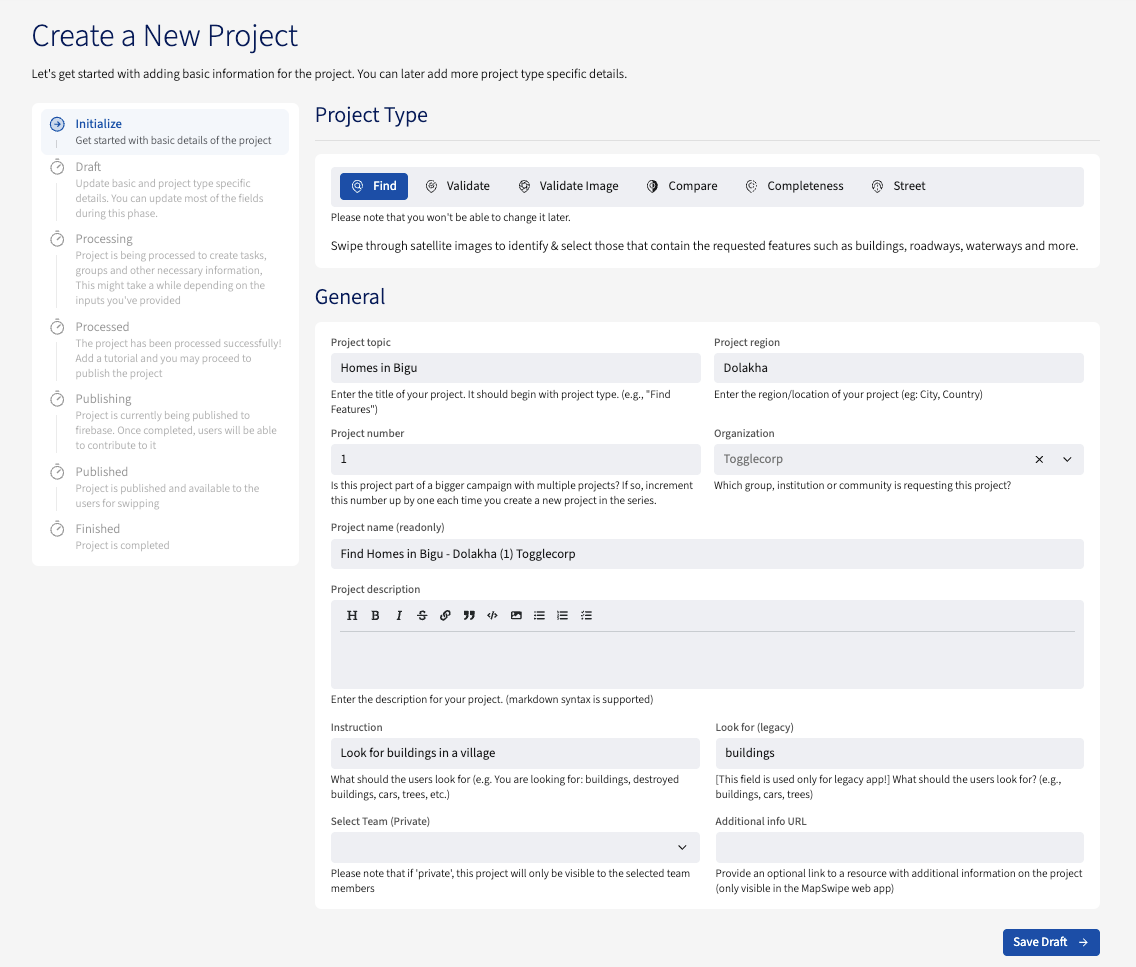
You can go to the Project page where all the projects are listed. From there, press the New Project button after which you'll be navigated to the 'Create a New Project' page which will look like following.
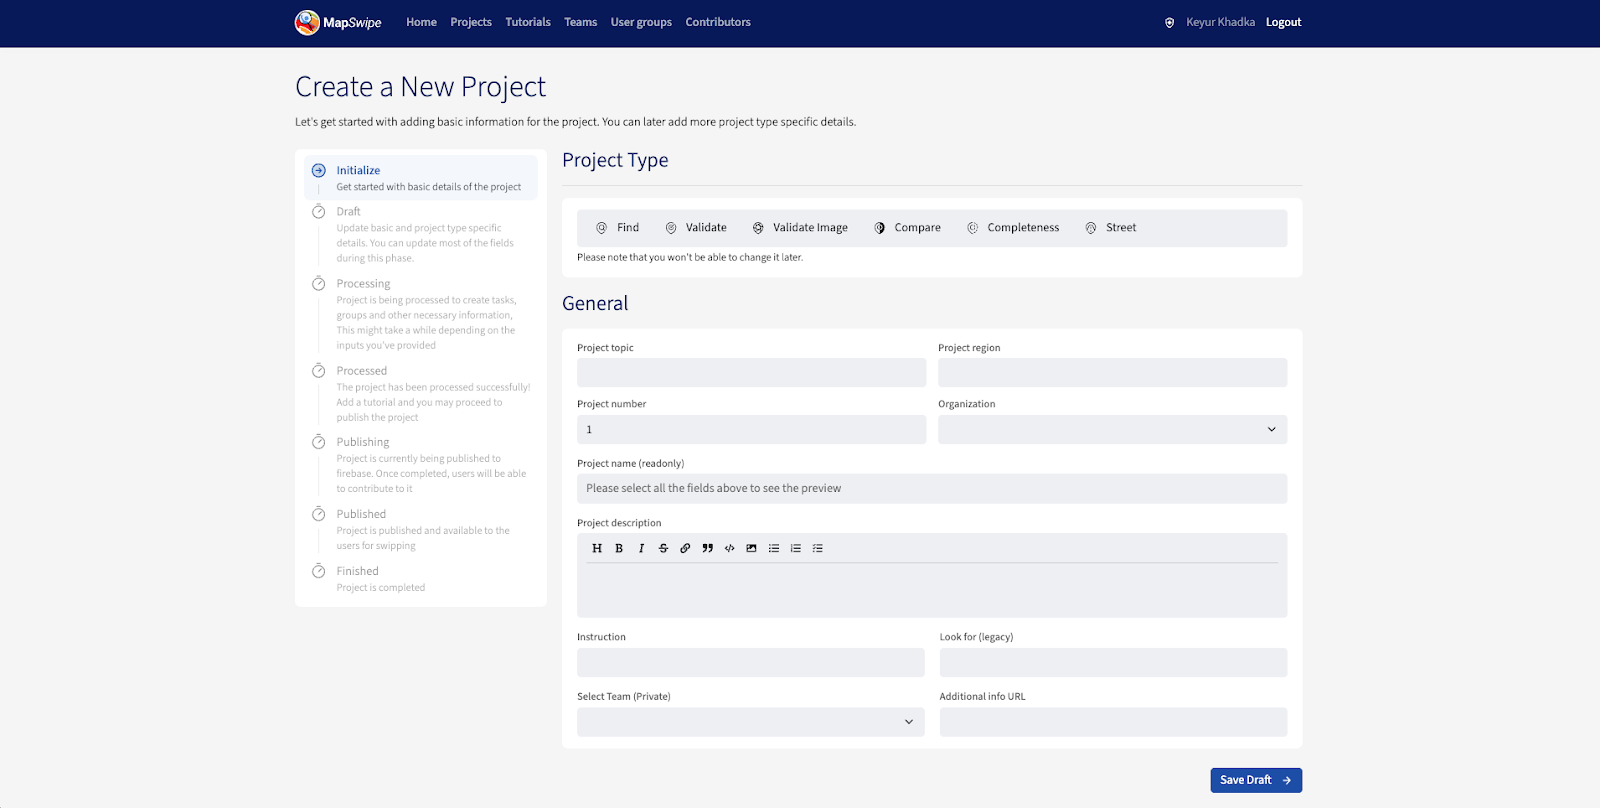
Summarized Flow
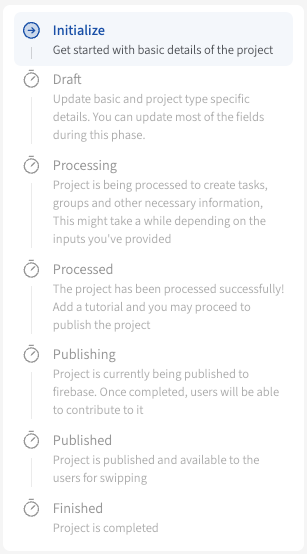
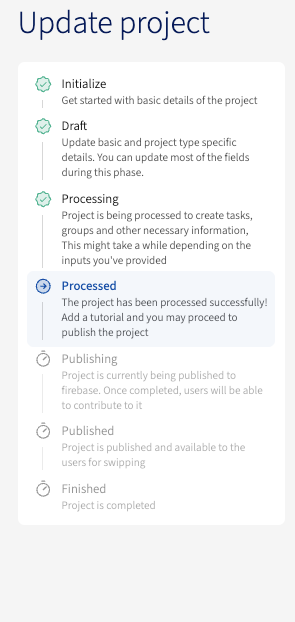
Creating a project in MapSwipe is segregated into different phases.
- Phase: Initialize
- Phase: Draft
- Phase: Processing
- Phase: Processed
- Phase: Publishing
- Phase: Published
- Phase: Finished
The overall flow can be summarized as below:
- Create a new project up to the 'Draft' phase and save the project

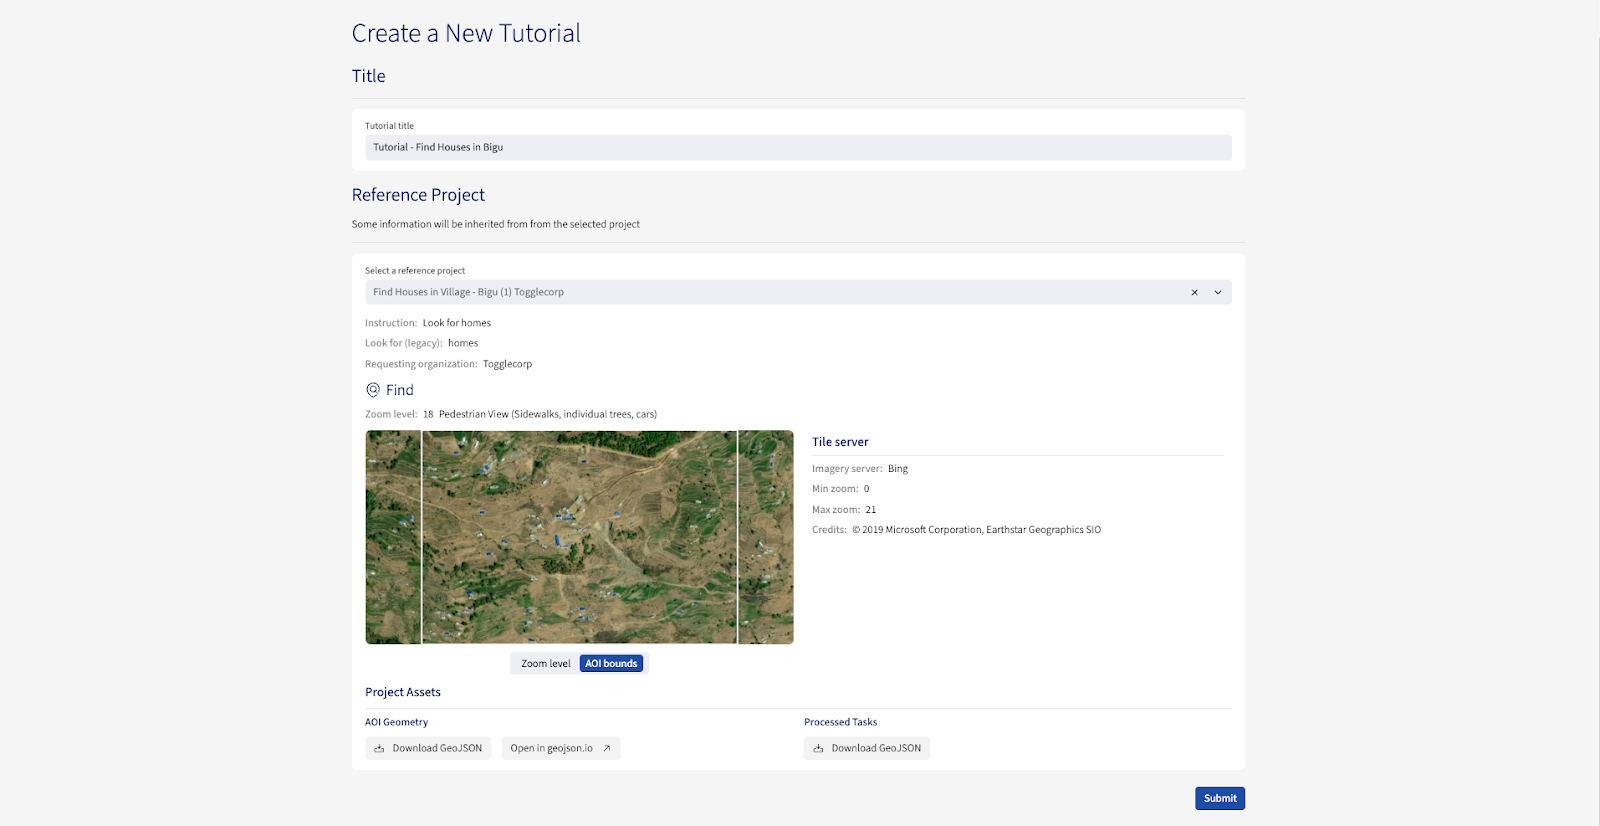
- Create a new tutorial for the project by selecting the above created project as reference project type. This will pre-fill the AOI used for the project.
- Continue creating the full tutorial for the project
- Continue creating the project that was in at least the 'Processed' phase by attaching the tutorial and publish the project
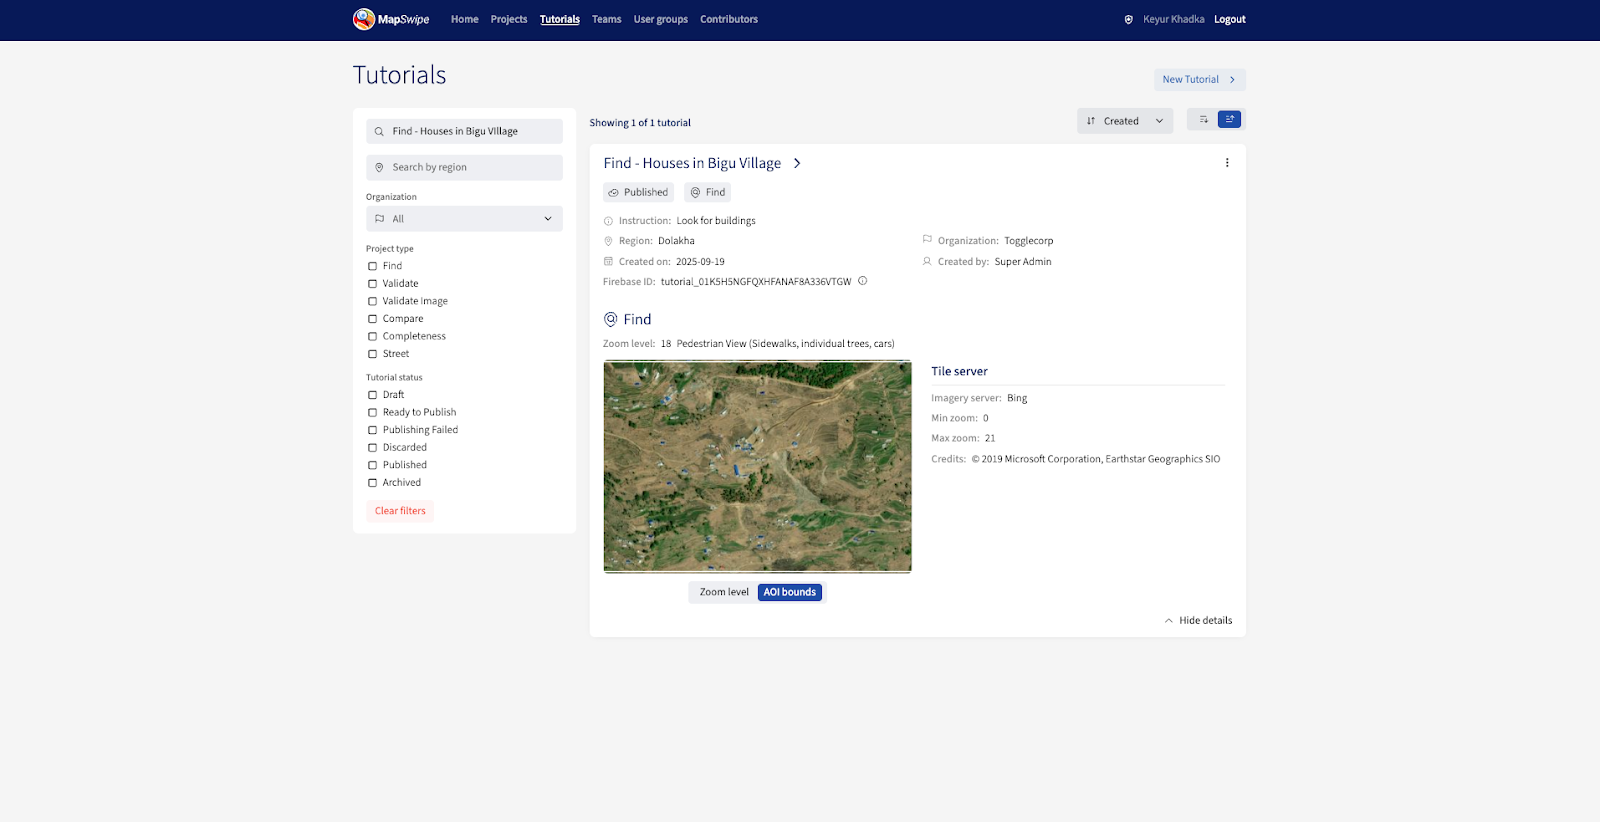
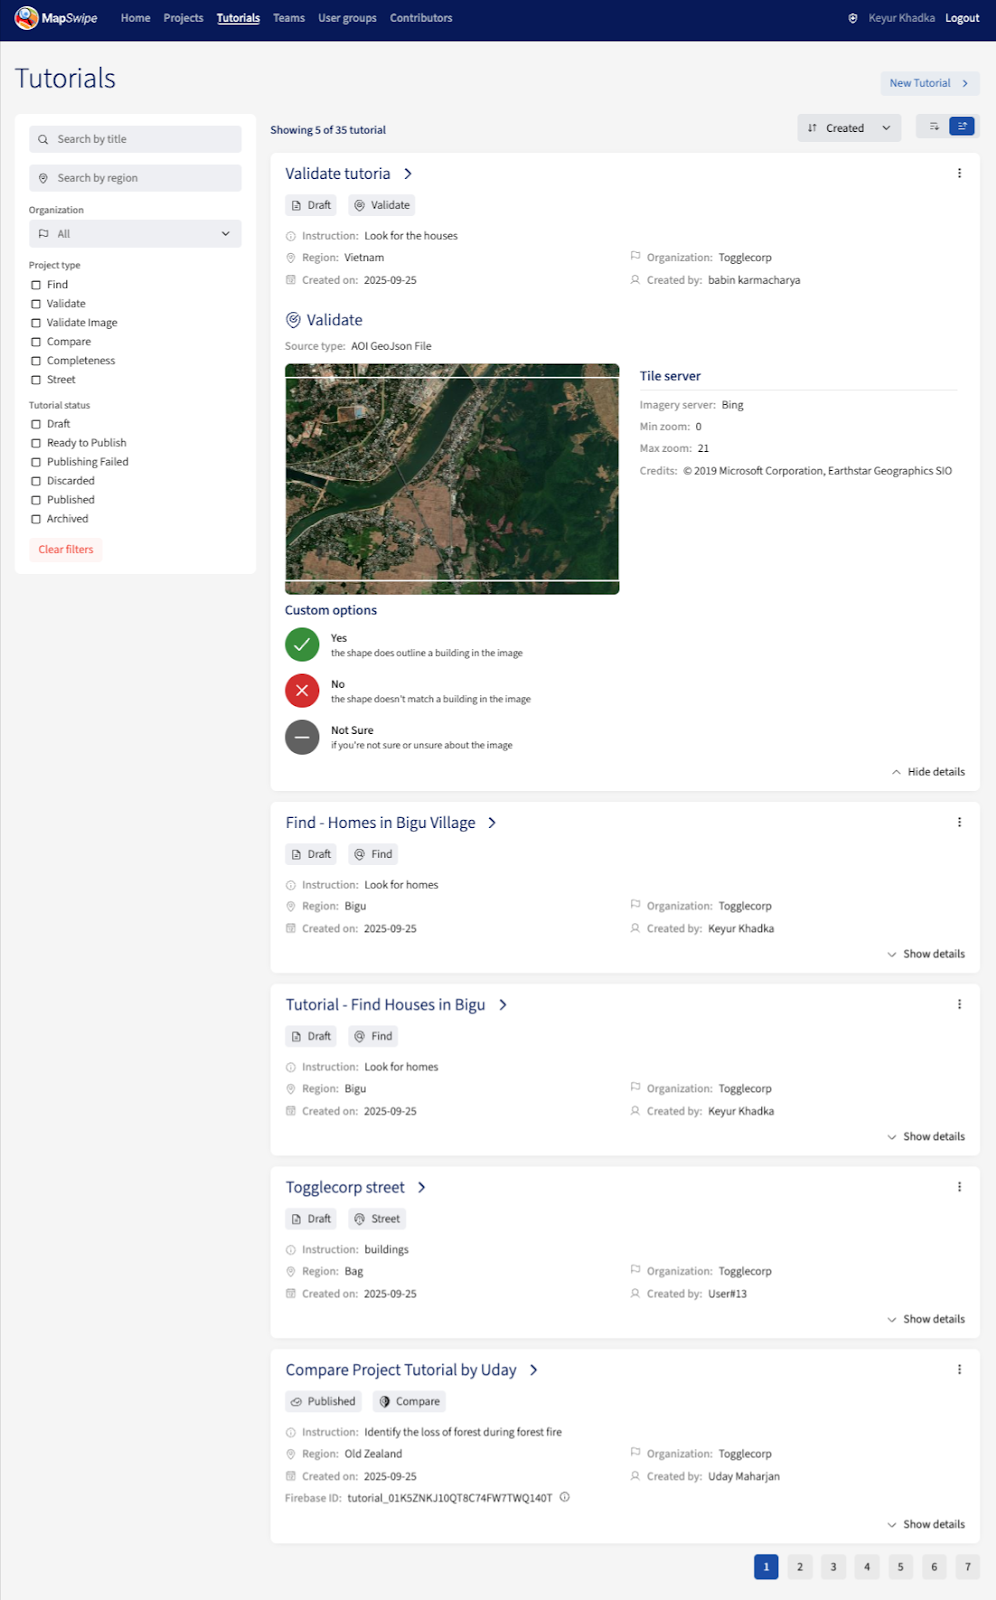
Tutorials
All the tutorials in MapSwipe are listed in a dedicated page. Users have the ability to quickly find the tutorial by adding filters as well as expand the tutorial to check more details with the 'Show details' button.
Tutorial creation flow
Please follow the steps below to create a tutorial
-
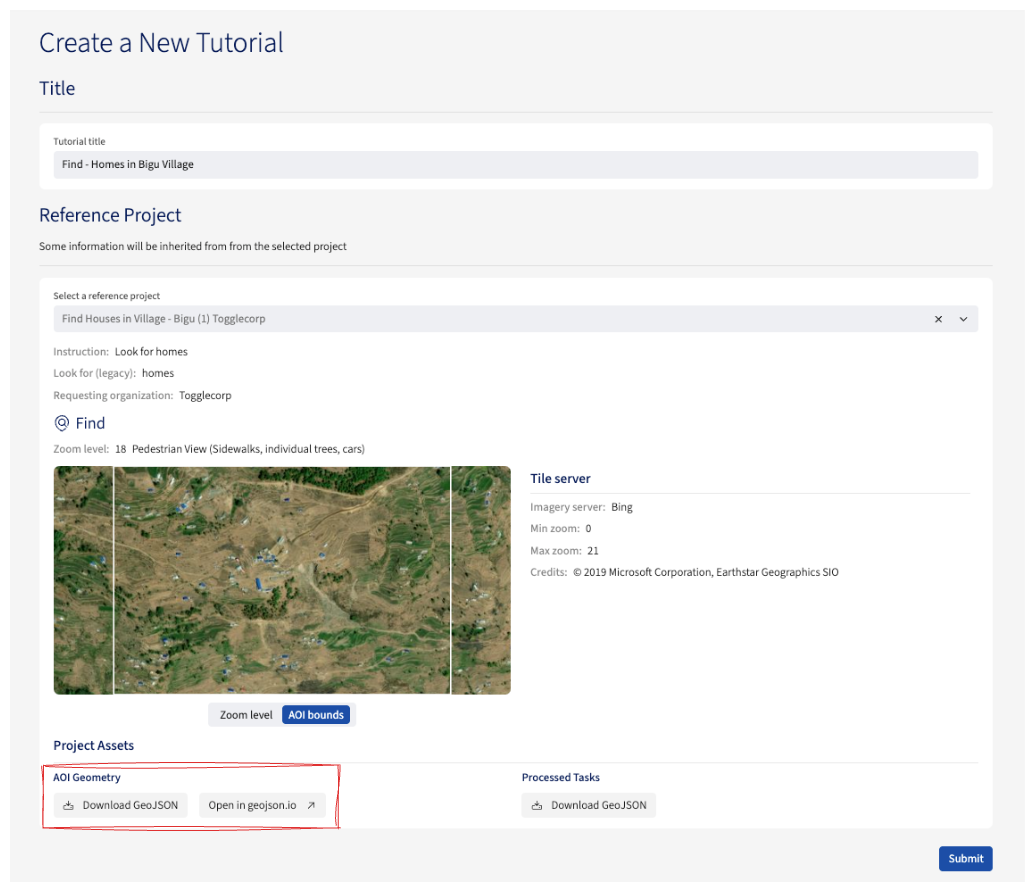
Section: General
- A clear tutorial title should be added
-
Section: Reference project
- An existing project should be selected (regardless of the project status)
- A tutorial geojson should be created from the project's AOI geojson file by downloading or to opening in geojson.io
-
Section: Information pages
- The information page should give users the general information of the tutorial
- There should be a minimum 1 information page, which can also be added as much as necessary
- A page should consist of at least a
titleandblock - Multiple blocks can be added for a single page

-
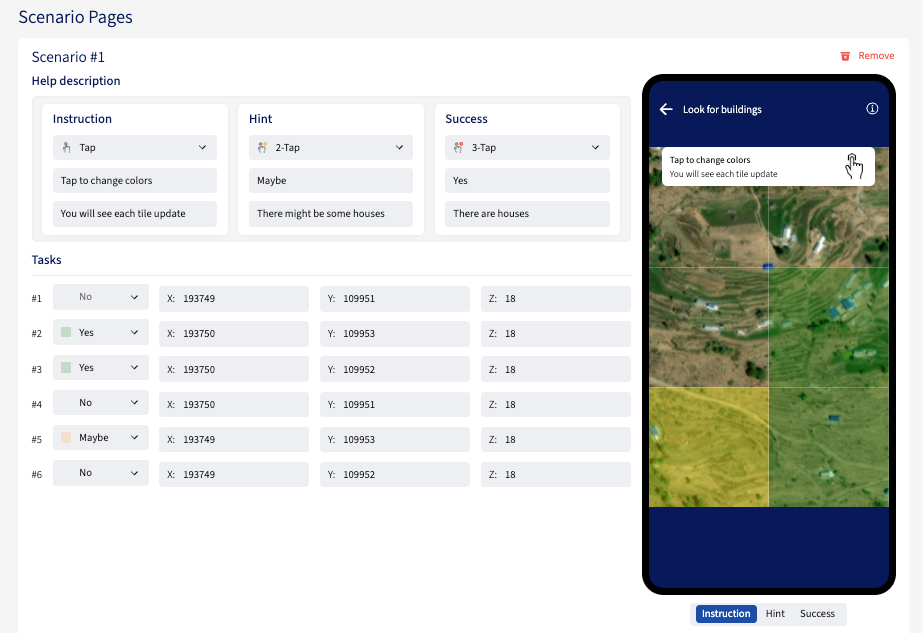
Section: Scenario pages
- The tutorial geojson created earlier (or an existing one) should be uploaded here
- The scenarios will be populated and rendered from the uploaded geojson
- Scenarios can be removed as required
- Each scenario should include three cases:
instruction,hint, andsuccess- Appropriate icon should be selected for each case from the existing list of icons
- Appropriate title should be set for each case
- Appropriate description should be set for for each case
- The reference for each task can be updated from the dashboard as needed
-
Clicking the 'Submit tutorial' button will begin the tutorial creation process and mark it as a
PUBLISHEDtutorial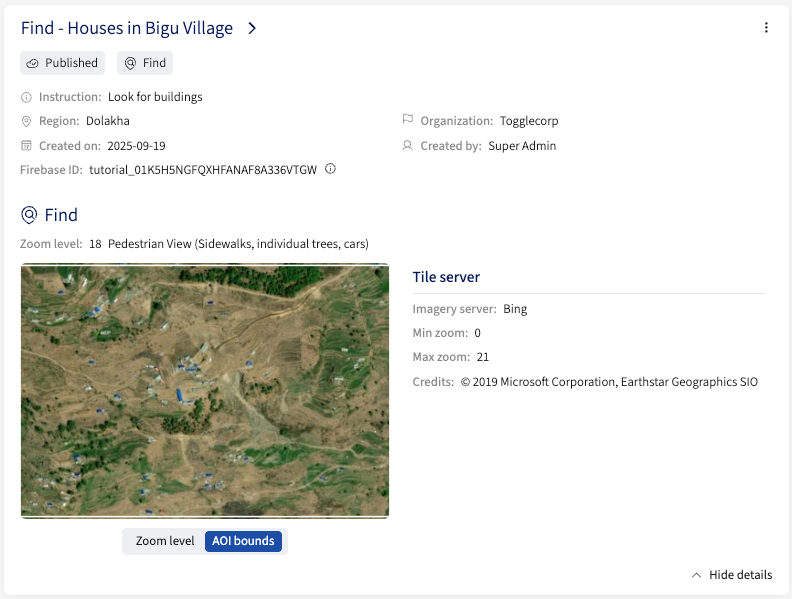
Tutorial states
- DRAFT: Tutorial is in a
draftstate when the tutorial creation has begun. - PUBLISHED: Tutorial is in a
publishedstate when the tutorial is processed and complete. - ARCHIVED: Tutorial is in an
archivedstate when the tutorial is no longer required to be visible. - DISCARDED: Tutorial is in a
discardedstate when the tutorial is no longer relevant or needed.
Tutorial states flow
A tutorial begins in the draft phase, from which it can either be published or discarded. If the publishing process fails, the tutorial enters the publishing failed state, where it can either be discarded or moved back to ready to process state. A tutorial in the ready to process state can either be successfully published or fail to publish, returning it to publishing failed. Once published, a tutorial can be moved to the archived state, and an archived tutorial can be published again.
Tutorial edit flow
Project managers have the ability to edit the details of the published tutorial except for the tutorial's area of interest geojson that is already processed.
Projects
All the projects in MapSwipe are listed in this dedicated page. Users have the ability to quickly find the project by adding filters as well as expand the project to check more details with the 'Show details' button.
Project creation flow
Please follow the steps below to create a project
- Phase: Initialize
- A project type should be selected
- The fields should be populated under the General section
- Clicking the 'Save Draft' button will save the project in a DRAFT stage
- Users can save the draft of the project and come back to complete the creation process anytime moving forward
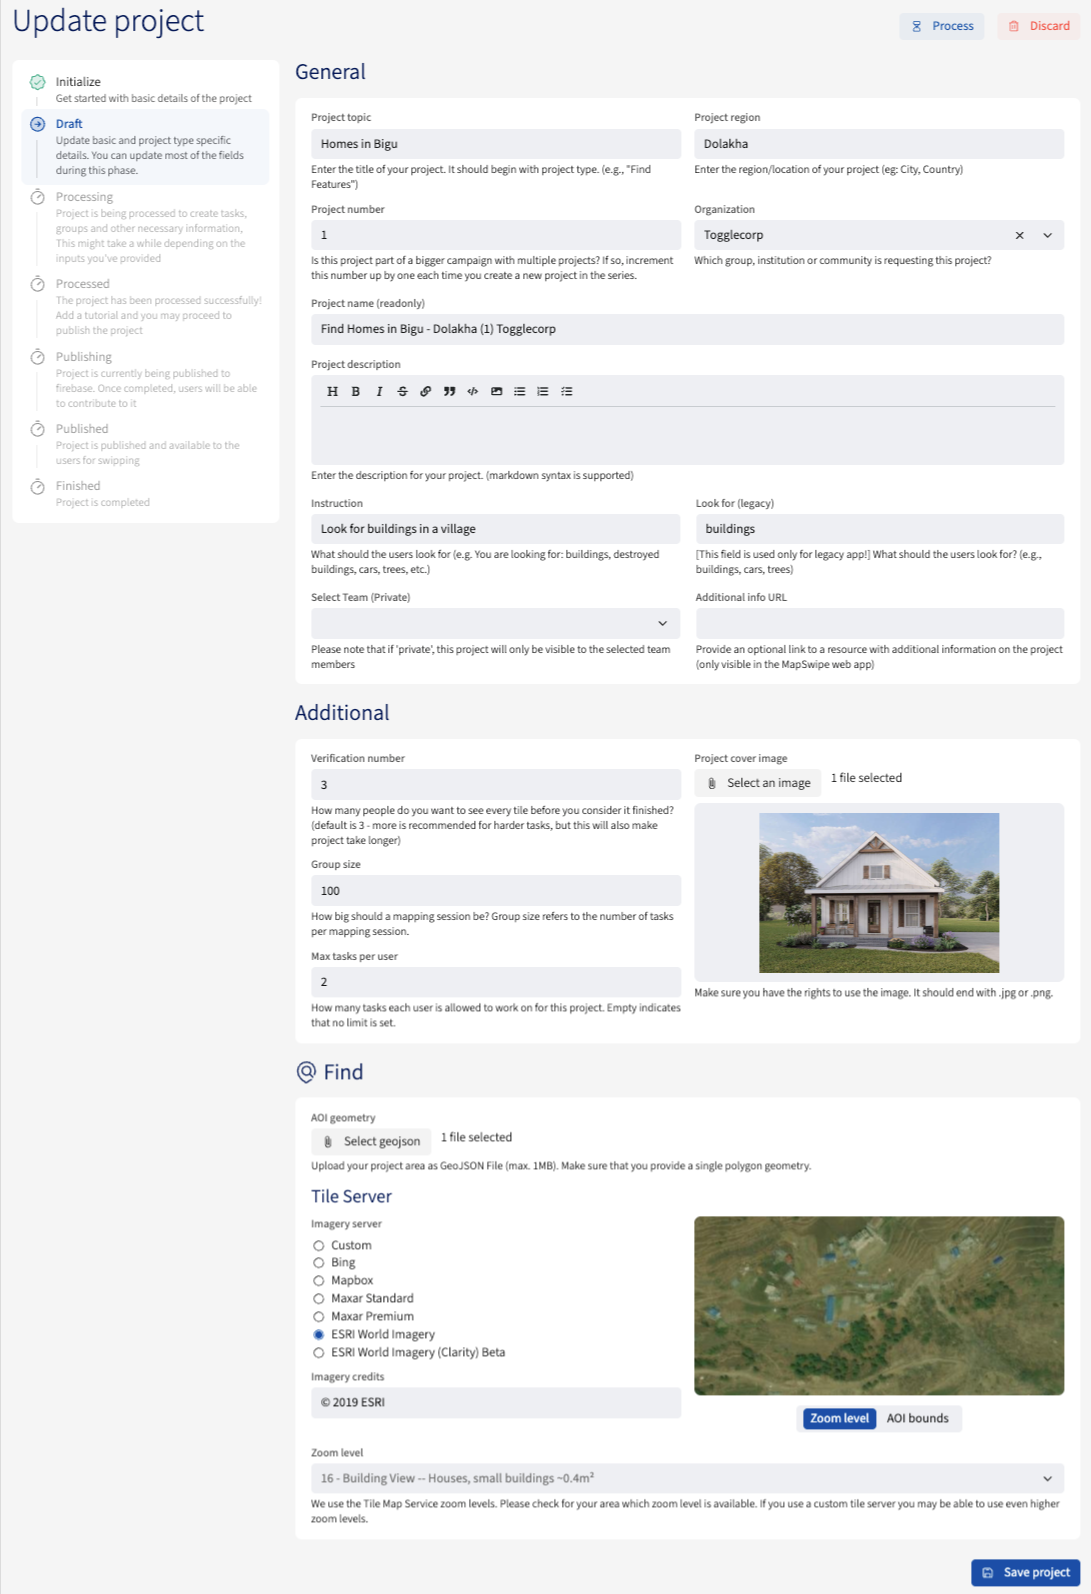
- Phase: Draft
- The General information will be populated here from the previous phase
- Users can update the information as needed, however the project type will already be set in the previous phase
- The fields under the Additional section will have default values, which can be edited as needed
- A project cover image can be uploaded, or a fallback default project type cover image will be used
- Uploading a geojson file under the {PROJECT TYPE} specific details is a must, after which, a tile server can be selected from the listed ones, or a custom imagery server URL can be used
- If using a custom imagery server URL, giving Imagery Credits is a must
The uploaded geojson will be rendered in the map window
- A zoom level can be set, or the default level will be used
The higher the zoom level, the farther the satellite view
- Users can save the project
- After the project is saved, users can process the project to move onto the next step
- The General information will be populated here from the previous phase
- Phase: Processing
- The project gets processed and users are redirected to the next phase
- Phase: Processed
- The General, Additional, and {PROJECT TYPE} specific details information are populated
- Users can update the general information as needed as well as the project cover image
- Users can attach a tutorial of the project type from the list of options
- Users can then update the project then publish project
- The General, Additional, and {PROJECT TYPE} specific details information are populated
- Phase: Published
- The project is published and available to map
- Phase: Finished
- Users can set the project as finished once the project reaches 100%
Project states
- DRAFT: Project is in a
draftstate when the creation process has begun and the initial form has been filled and saved by the user. - PROCESSED: Project is in a
processedstate when the form has been processed and processed. - PROCESSING FAILED: Project is in a
processing_failedstate when the geojson cannot be processed. - READY_TO_PUBLISH: Project is in a
ready to publishstate when the project is ready to be published. - PUBLISHED: Project is in a
publishedstate when the project is available in the applications. - PUBLISHING_FAILED: Project is in a
processing_failedstate when the geojson cannot be processed. - PAUSED: Project is in a
pausedstate when the project is not active for mapping. - WITHDRAWN: Project is in a
readystate when the form has been processed and passed. - DISCARDED: Project is in a
discardedstate when the project is no longer required. - FINISHED: Project is in a
finishedstate when the project progress has reached 100%.
Project states flow
A project begins in the draft phase, from which it can either move to ready_to_process or be discarded. If processing fails, the project enters the processing_failed state, where it can either be discarded or moved back to ready_to_process. A project in the ready_to_process state can either be successfully processed or fail, moving it to processed or processed_failed, respectively. Once processed, a project can either move forward to ready_to_publish or be discarded. From ready_to_publish, the project can either be published or fail to publish, sending it to publishing_failed. A project in the publishing_failed state can be discarded or moved back to ready_to_publish. Once published, a project can be archived, paused, or withdrawn, and if paused, it can be published again.
Project edit flow
Project managers now have the ability to edit the basic details of the project (as listed below) except for the area of interest geojson uploaded and processed.
Please note that the project must be paused before any edits can be made.
- Project topic
- Additional info url
- Project description
- Project image
- Project instruction
- Look for (legacy field)
- Project number
- Project region
- Switch tutorial used
Important notes
General points of attention while creating a project:
- Verify if the project name is clear
- The default verification count is 3. The algorithm is calculated on that. Less person looking at one square has implications on the quality of the MapSwipe data. The best results we have is with a 5 person verification.
- Re-read, correct and improve the description given through the request.
- Check if the image is the good format and if the size is not to big - max 1MB. The image will be show as a thumbnail for your project.
- Check the imagery selected available for the area, we learned that good imagery is key to keep a project going. If the imagery is not good enough or covered by clouds adjust the area. You need to zoom in till level 18.
- Max area for project type in km2 is calculated with this formula:
5 * (4 ** (23 - zoom_level))- At zoom level 14, the maximum area is calculated using the formula 5 × (4^(23 − zoom_level)), which results in a value that is approximately equal to the size of Peru. Based on this calculation, the MAX_AOI_GEOMETRY_AREA is set to 1,310,720.
For Find Features, Check Completeness and Compare Dates projects:
- MapSwipe can only process geographical areas up to km2 calculated from the above formula. Check if the GeoJSON you received has this size. If not, you may need to split up the area into multiple pieces, and create more than one MapSwipe project out of the area.
- The GeoJSON needs to be a flat polygon, check this and change (in geojson.io or QGIS) if needed.
For Validate Footprints, View Streets projects:
- The GeoJSON file should contain only simple Polygons. We currently don't support complex Multipolygon geometries (e.g. polygon with holes)
Once you publish the project, they will appear in the Manager Dashboard and the mobile or web app for the users to begin mapping. Additionally, a project Slack message is also sent to the Slack channel mapswipe-projects-notifications with project updates coming via Slack message thread. Important Slack messages are sent in thread as well as the main channel.
Organizations
All the organizations, be it active or archived, are listed in the Organizations section of the home screen. Project managers can add a new organization clicking the 'New Organization' button and simply adding the organization name, description, and abbreviation.

Organization edit
Users can click on the options icon to edit the organization where all organization information can be edited
Managers
The home page has a section called Managers where all the project managers of MapSwipe are listed however their email address is protected. To add or remove a project manager, please refer to the 'Becoming a project manager' section above.

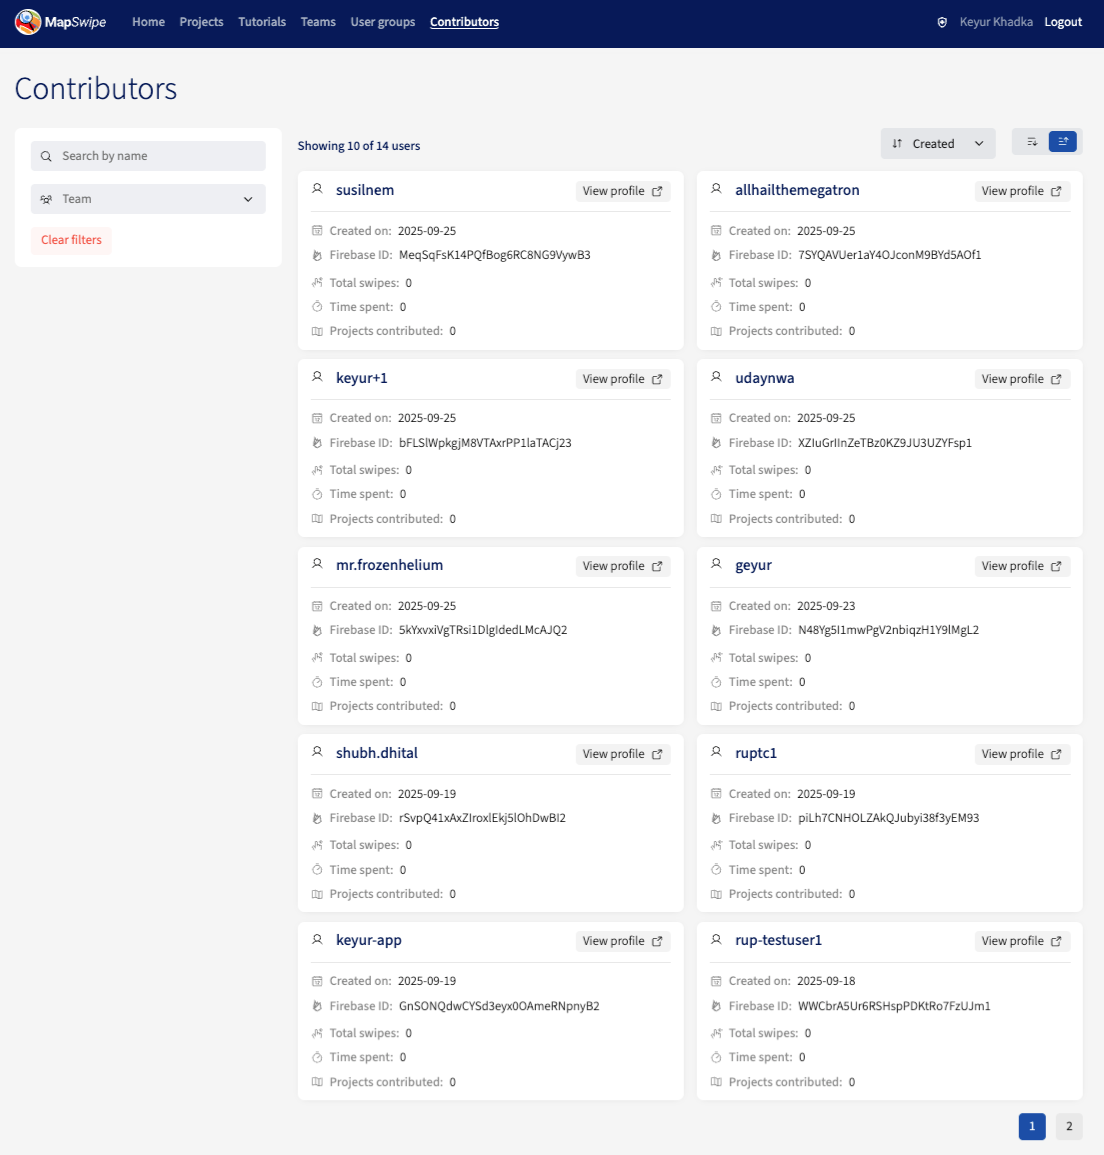
Contributors
The Contributors page lists all the contributor users (MapSwipe app users) that are signed up in MapSwipe. The contributor user's general stats are displayed in the card and their community dashboard profile can be opened as well including the icon
User Groups
The User Group page lists all the user groups in MapSwipe where contributor users can join.
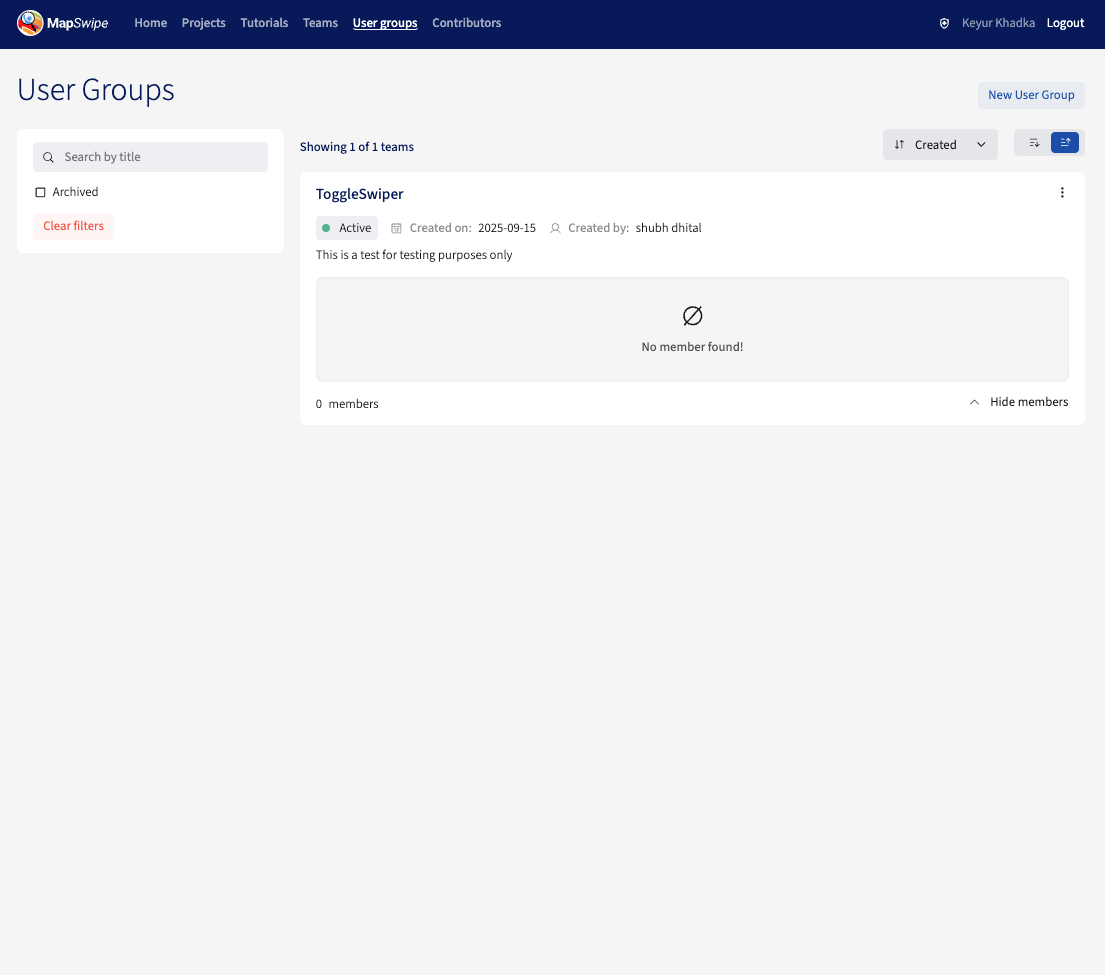
User Groups edit
Users can click on the options icon to edit the user group where all user group information can be edited
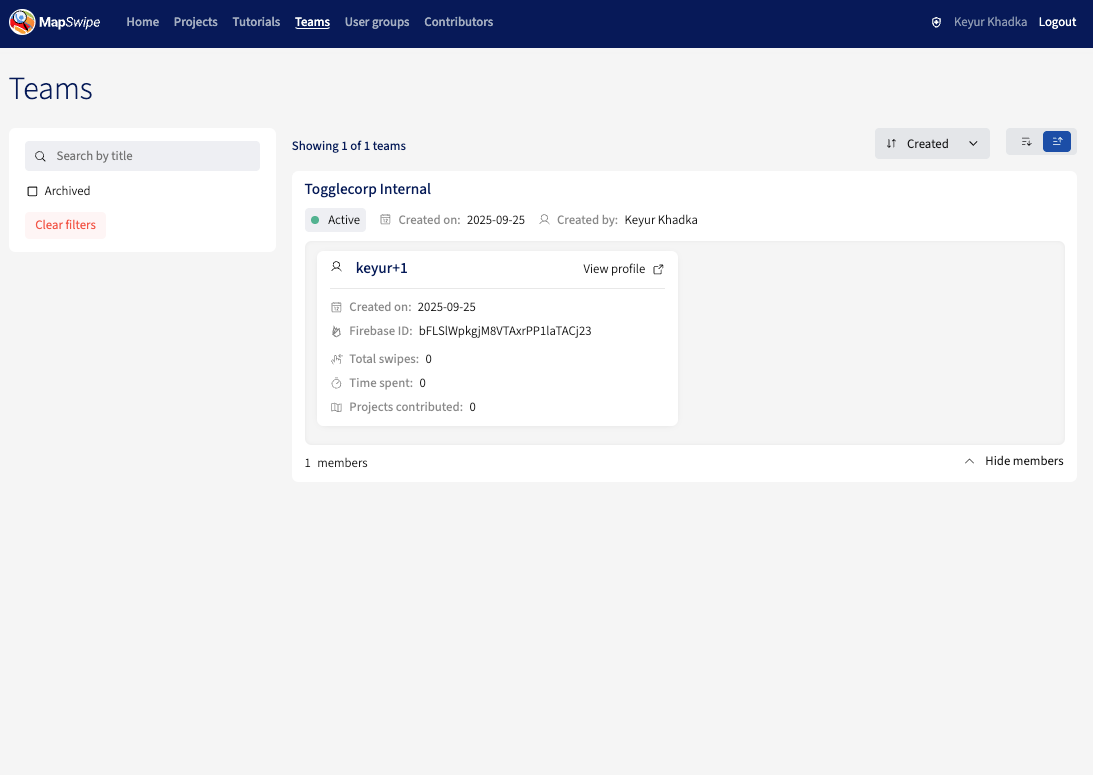
Teams
The Teams page lists all the active teams along with the team's members. Only super admin has the ability to add a team that will be displayed here.
Adding team members
Since Teams is a sensitive subject matter, only super admins have the ability to add users to a team. If you would like to add a team member, please reach out to the super admin